Wednesday, November 25, 2015

Capture One and Phase One

A Brief Description of Setting Up Capture One and the Phase One Camera to Capture to the Studio Computer


1.  Open Capture One 7 and start a new session
2.  Turn on the Phase One Camera and back and plug in the fire wire cable to the back.
3.  Look under the camera icon in the camera section of CaptureOne to see if the PhaseOne P40+ is displayed.
4.  Start shooting.
5.  At the end of the shoot copy the capture folder to your own had drive and then import into Lightroom.

This is the solution to the inability of the PhaseOne camera to capture during our in house demonstation:

  • P+ Backs/P backs exc. P20 and P25
  • The Thunderbolt Terminal does not have the same Power Output as a standard Firewire Port (400 or 800) so it is recommended that the back used be set to "Battery" as the main power source to avoid communication failure.


  • If there are problems look at the manuals below

    Here is the Phase One Camera Quick Guide

    Here is the Phase One Camera User Guide

    Here is the Capture One Manual

    Here is a link to the Phase One Website that talks about Tethered Shooting with Capture One:

    Tethered Shooting

    Tuesday, November 24, 2015

    Assignment 12 Night Photography

    Go outside between dusk and dawn using whatever existing light is available recognizing the properties of light we learned and used in the studio and how it occurs at night.  Make a photograph that is surprising by what it reveals.

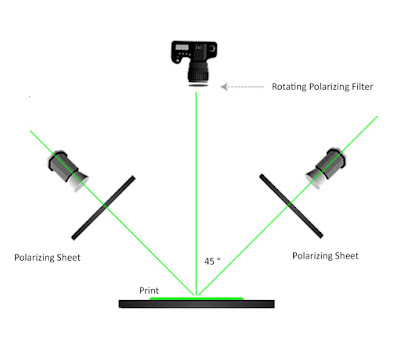
    Lesson 12 Night Photography, Cross Polarization and Camera Comparison


    We looked at the work of a few photographers whose vision of the night is unique.

    Brassai


    Wednesday, November 18, 2015

    Name Pronunciation Guide

    ...

    Assignment 11 Still Life

    Photograph a Shiny  object and define its shape and characteristics by use of it reflective qualities.

     Photograph a transparent object and define its shape and characteristics by using its transparency.

    Lesson 11 Still Life

    How to Capture a series of images using different lights:
    Use the PocketWizard MultiMax set to transmit.  Press the menu key and then press A:Advanced Menu and then Press D:Speedcycler. Set the channel to any number that is 17 or higher.  Press A-D depending on the number of separate lights you want to capture.  Using the Profoto 1200R train it to be the number set on the transmitter and one of the letters starting with A.  You can also use the PocketWizard III to set channel numbers 17 and above and one of the 4 letters. Now each time you press the MultiMax it will set off the lights in sequence and then repeat the sequence over and over.


    Tuesday, November 10, 2015

    Assignment 10 Canon Transmitter ST-E3=RT and 600EX-RT Flash

    Work in Groups in the Studio for this Assignment.  Each member of the group should make a portrait using 3 Speedlites from different directions, controlled manually from the Transmitter attached to the camera which is also set on manual.  Each member of the group should make a unique lighting setup.  You can modify the light coming from the 600EX to a broad source of light by using diffusion, umbrella, soft box or bouncing off a wall or card. You can also use the light directly.


     Set the Master to GR and set A, B, C and D (Optional) to M.   The three slaves will set themselves to M after the test button on the transmitter is pressed.  Use the ST-E3-RT to adjust the setting manually.


    Take a picture of the ambient light in the room at the fstop and shutter speed you will be using.  It should come out black. Post this picture with it's settings.

    Post the the progression of images (ie one light, 2 lights, 3 lights etc) with final exposure for each shot (should all be the same)

    I realize this is an ambitious assignment and that you might not have time for each member of the group to accomplish their own unique version.  Do the best you can and good luck.

    Lesson 10 Using the Canon Speedlite ST-E3-RTand the 600EX-RT with the Canon 5DMIII


    Bruce Dorn's Introduction to Canon's Speedlite's system click here


    Quick Guide to Speedlite Transmitter ST-E3-RT Setup click here

    There is a way to adjust the Speedlite setting on the 5DMIII.  Check out where to find Flash Function Settings in the 2 pages from the camera manual.  You might find it easier to make adjustments:

    Tuesday, November 3, 2015

    Assignment 9 Outdoor Flash

    1. Make a portrait where the person’s face and the background are the same exposure.
    2. Make a portrait where the person’s face is exposed one stop under and the background is normally exposed.  Drop the power of the strobe by one stop keeping the f stop the same.

    3. Make a portrait where the person’s face is normally exposed and the background is one stop under.

    4. Make a portrait where the person’s face is normally exposed and the background is two stops under.

    All four should be photographed in exactly the same place to make it earier to compare the results.

    This is a test for your reference and should be laid out accordingly.

    Print your f stop and shutter speeds.

    Subject should be 2 or 3 stops darker than background.

    Equipment List to check out from the cage:

    Profoto 600B battery strobe
    or
    Qflash with mini to house hold sync cord
    Camera
    Flash Meter
    2ea PocketWizards
    Tripod
    Pic Light Stand

    Lesson 9 Outdoor Flash